Beyond Off-the-Shelf: The Tangible ROI of a Custom Keyboard
For anyone spending significant time at a desk, a keyboard isn’t just a peripheral; it’s a crucial interface. While off-the-shelf options serve a basic purpose, investing the time to build a custom mechanical keyboard offers remarkable long-term financial benefits and performance enhancements that far outweigh the initial effort.
Consider the mechanical keyboard ROI through durability. Unlike mass-produced alternatives designed for planned obsolescence, a custom build utilizes high-quality components meant to last decades, not years. This inherent repairability means you’re replacing individual switches or keycaps, not entire keyboards, significantly reducing replacement costs over time.
Beyond savings, a custom keyboard for productivity is a game-changer. Tailor-made layouts, dedicated macro keys for complex workflows, and switches that perfectly match your typing style lead to faster, more efficient work. Every keystroke feels precise and comfortable, minimizing errors and maximizing output.
The ergonomic custom keyboard benefits are equally compelling. You choose the exact switches, keycap profiles, and even the case angle to minimize strain and fatigue during long sessions. This personalization is vital for maintaining comfort and health; for general guidance, explore these ergonomics tips for computer users.
Ultimately, there’s immense satisfaction in a personalized typing experience – a tool crafted precisely to your aesthetic and functional needs. This blend of financial prudence, enhanced efficiency, superior comfort, and personal satisfaction truly makes a custom keyboard a savvy investment. To unlock these benefits, your journey begins with understanding the essential components that bring your vision to life.
Understanding the Foundation: Essential Components of Your Custom Keyboard
To truly build a custom mechanical keyboard that meets your unique demands for ROI and productivity, you must first become familiar with its core anatomy. Think of these as the building blocks that will bring your personalized typing experience to life, dictating everything from feel to sound to functionality.
At the heart of any custom keyboard lies the Printed Circuit Board (PCB). This is the brain, registering your key presses. You’ll typically choose between hot-swappable keyboard PCBs, which allow you to effortlessly swap out switches without soldering, making them ideal for beginners and experimenters, or soldered PCBs, which offer a more permanent solution. PCBs also come in various form factors like 60%, 65%, TKL (Tenkeyless), and full-size, dictating your keyboard’s layout and footprint. Understanding these PCB types is crucial for your design.
Encasing the PCB and other mechanical keyboard components is the keyboard case. Materials range from premium aluminum for a weighty, resonant sound and feel, to acrylic for unique aesthetics, or more budget-friendly plastics. Mounting styles are also vital; gasket mount offers a softer, more flexible typing experience, while tray mount provides a firmer feel. The choice here profoundly impacts the overall acoustics and tactile feedback.
Sitting between your PCB and switches is the plate. This component further refines the typing feel and sound. Materials like brass offer a firm, higher-pitched experience; aluminum is a balanced, common choice; and polycarbonate provides more flex and a deeper, softer sound.
Next, you choose your keyboard switches – these are arguably the most impactful choice for typing feel. They come in three main types: linear (smooth, consistent press), tactile (a discernible bump), and clicky (an audible click). Beyond type, consider actuation weight and sound profile from popular brands like Gateron or Kailh. For larger keys like the spacebar or shift, stabilizers are critical. These prevent wobbling and ensure smooth, even presses. Whether plate-mount, PCB-mount, or screw-in, properly modding (lubing and clipping) your stabilizers dramatically improves the typing experience by eliminating rattle.
Finally, the keycaps are the visible interface with your keyboard. Profiles like Cherry, OEM, SA, or XDA dictate their shape and ergonomic feel, while materials like durable PBT or smooth ABS influence longevity and texture. Understanding these custom keyboard parts is your first step; for a wide selection, you might explore various keyboard parts and kits available online.
With a grasp of these fundamental components, you’re ready to move into the strategic phase of your build. The next step is to plan your perfect setup, focusing on compatibility, budget, and the essential tools you’ll need to assemble your dream keyboard.
Planning Your Perfect Build: Compatibility, Budget & Tools
Now that you understand the core components, the next critical step for your successful DIY mechanical keyboard build guide is meticulous mechanical keyboard planning. First, tackle the compatibility checklist: your chosen PCB, plate, and case must align, not just in size but also in layout (e.g., standard ANSI vs. HHKB). Rushing this can lead to frustration and wasted investment, so for a thorough understanding, consult a comprehensive compatibility guide.
Next, establish a realistic custom keyboard budget. While premium components are enticing, strategically invest in elements that truly impact feel, like switches and the PCB, where ROI is clearest. You can often save on initial keycaps or opt for a more budget-friendly case. A pivotal decision influencing both budget and future flexibility is between a hot-swappable vs soldered PCB. Hot-swap boards allow for tool-free switch changes, primarily needing only a switch and keycap puller. Soldered builds, while requiring more initial skill, often offer more stability and demand a soldering iron, solder, and flush cutters, in addition to a screwdriver set for assembly. Regardless of your choice, essential keyboard building tools like lubricant and brushes are non-negotiable for a premium feel.
Finally, consider where to purchase your components. Reputable vendors and community marketplaces offer a vast selection. With your plan solidified and all components sourced, you’re now perfectly poised to embark on the exciting hands-on phase of bringing your custom keyboard to life.
Step-by-Step Assembly: Bringing Your Custom Keyboard to Life
With your components meticulously chosen and sourced, it’s time to transition from planning to the gratifying process of how to assemble a mechanical keyboard. This hands-on phase is where your vision truly takes shape, culminating in a personalized typing experience.
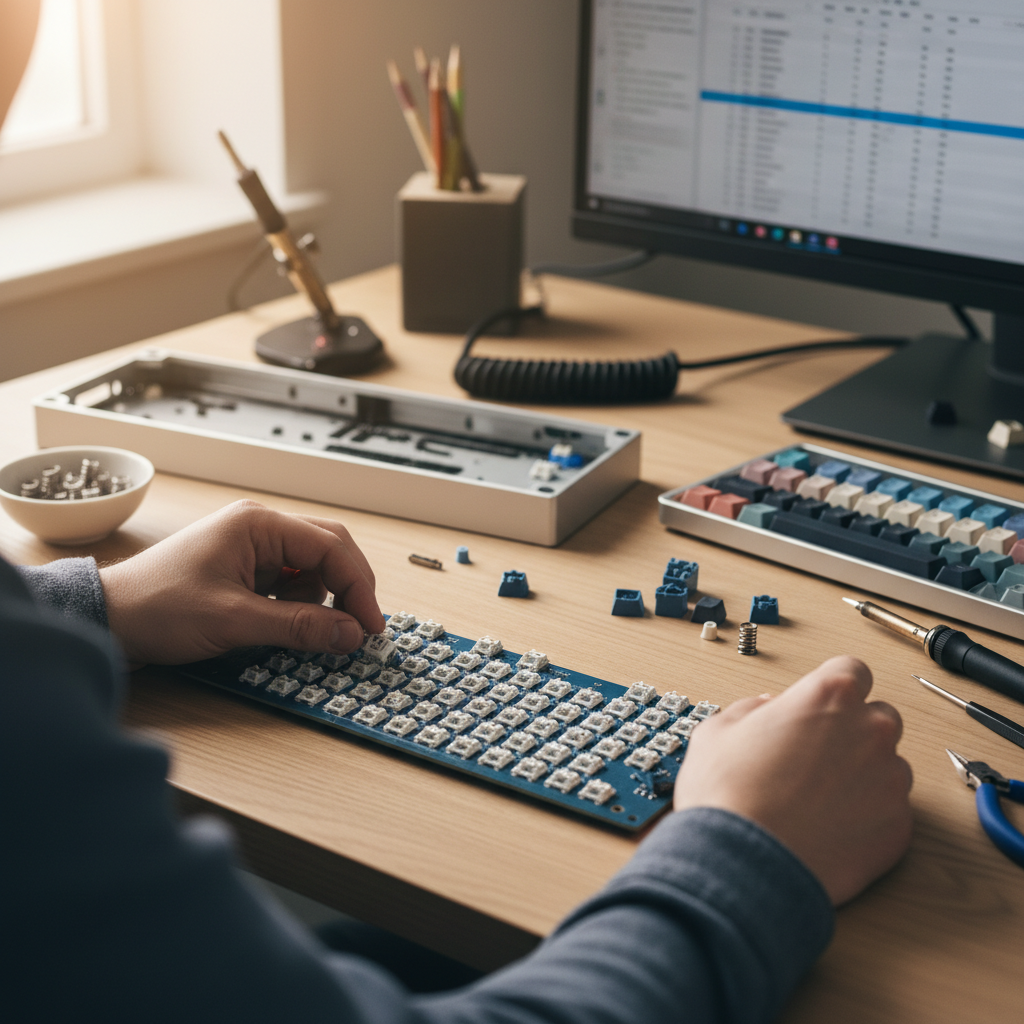
The journey begins with stabilizer modding. These often-overlooked components are crucial for ensuring your longer keycaps (Spacebar, Shift, Enter) feel smooth and rattle-free. Start by clipping the small feet off the stabilizer stems – a common modification that eliminates a mushy bottom-out. Next, generously lube the stems and wires with a high-viscosity lubricant like dielectric grease or Krytox 205g0. Some enthusiasts even apply a “Band-Aid mod” by placing small adhesive bandages under the stabilizer housings on the PCB to further dampen sound. Once prepped, carefully mount these improved stabilizers onto your PCB, whether they are the screw-in or clip-in variety, ensuring they sit flush and secure.
Next up is installing mechanical switches. If you’ve opted for a hot-swap keyboard assembly, this step is remarkably straightforward. Align each switch’s pins with the corresponding holes on your plate, pressing them in until they click into place. Then, carefully align the assembled plate and switches with your PCB, pushing each switch gently until its pins are fully seated in the hot-swap sockets. For soldered builds, the process of soldering keyboard switches requires a bit more precision. Insert the switches into the plate, then align the plate and switches with the PCB. Ensure each switch is oriented correctly, then flip the PCB over and solder the two pins of each switch to its pads. If you’re new to soldering, resources like SparkFun’s Soldering Basics can provide an excellent foundation.
Before securing everything into the case, it’s critical to test your PCB. Connect it to your computer and use an online keyboard tester (easily found with a quick search) to verify that every switch registers correctly. This step is invaluable for troubleshooting any faulty switches or solder joints before final assembly, saving you significant rework later.
Once testing is complete, proceed to assemble the case. Carefully place the PCB/plate assembly into your keyboard case, ensuring all alignment posts and screw holes line up. Fasten the screws, but be mindful not to over-tighten, as excessive torque can warp the PCB or case, affecting both aesthetics and performance. The final touch of your custom mechanical keyboard assembly involves placing the keycaps. Start with the larger keycaps, then systematically populate the rest of the board according to your chosen layout, ensuring each cap sits snugly and evenly on its switch.
Your custom keyboard is now physically assembled, a testament to your effort and vision. But the journey doesn’t end here; the real productivity gains often come from fine-tuning its digital brain.
Unlocking Potential: Advanced Customization for Professional Workflows
Now that your bespoke hardware is ready, it’s time to unlock its true potential through software—transforming a mere input device into a precision instrument tailored for professional keyboard workflows. This is where powerful open-source firmware like QMK and VIA come into play, offering unparalleled advanced keyboard customization. With QMK (Quantum Mechanical Keyboard) firmware or the more user-friendly VIA firmware, you gain complete control over every keystroke and LED. These platforms empower you to transcend standard layouts, creating a truly personal and efficient typing experience.
Imagine crafting custom key mapping for specific applications. You can set up multiple layers, dedicating one for coding with quick access to debugging commands, another for video editing shortcuts, or a writing layer optimized for markdown. These dynamic layers, accessible with a single modifier key, dramatically reduce hand travel and cognitive load. Beyond remapping, the true magic lies in keyboard macros for productivity. Automate complex sequences—like compiling code, inserting boilerplate text, or launching multiple applications—with a single press, reclaiming valuable minutes throughout your day. For a QMK custom keyboard, this level of automation becomes a game-changer. And yes, even LED customization, from subtle backlighting to vibrant RGB effects, can be tuned to your preference, creating an environment that aids focus or simply expresses your style.
For programmers, designers, writers, or anyone pushing the limits of their digital workspace, this level of personalization isn’t just a luxury; it’s a strategic investment. By integrating these capabilities into your professional keyboard workflows, your custom mechanical keyboard becomes an indispensable tool, driving significant ROI through unparalleled efficiency. But what good is a finely tuned machine if it’s not cared for? Next, let’s discuss how to sustain this investment and ensure your custom creation stands the test of time.
Sustaining Your Investment: Comprehensive Maintenance & Longevity Strategies
Just as a high-performance vehicle requires regular servicing, your custom mechanical keyboard, a finely tuned instrument of productivity, demands consistent care to deliver peak ROI. A critical aspect of extend keyboard lifespan and ensuring continued satisfaction is establishing a solid custom keyboard care routine. Start with regular cleaning to prevent dust and debris from degrading performance. Gently remove keycaps for a thorough wipe-down, clean the case with a microfiber cloth, and use compressed air or a brush to clear crumbs and dust from under the keycaps. For a detailed keyboard cleaning guide, check out resources like iFixit’s Mechanical Keyboard Cleaning Guide. These mechanical keyboard maintenance tips are crucial for maintaining responsiveness and feel.
Beyond routine cleaning, consider the benefits of lubing mechanical switches. This process, while a bit time-intensive, significantly enhances typing feel and sound, making switches smoother and quieter, which directly contributes to a more pleasant and productive experience. Should you encounter any snags, such as chattering switches, unresponsive keys, or firmware glitches, proactive troubleshooting keyboard issues can often resolve them quickly, preventing minor annoyances from escalating.
Furthermore, your custom keyboard’s modular design means you’re not stuck with initial choices forever. Component upgrades, like refreshing your switches, stabilizers, or keycaps, can breathe new life into your setup, evolving with your preferences and ensuring your investment remains relevant. Lastly, for times when your keyboard isn’t in use, proper storage – such as a dust cover or a padded case – is essential to protect it from environmental damage and physical wear, ensuring it’s ready to perform when you are.
Senior technology analyst covering enterprise software, AI, and digital transformation. James has spent over a decade helping business leaders understand how emerging tech reshapes competitive strategy.