Why Precision Pays Off: The ROI of 3D Printer Calibration
While a visually stunning print is undeniably satisfying, the true power of precise 3D printer calibration extends far beyond mere aesthetics. For businesses and serious enthusiasts alike, investing time in meticulous calibration translates directly into significant financial and operational advantages, offering a tangible return on investment (ROI) that can’t be overlooked.
One of the most immediate 3D printer calibration benefits is the drastic reduction in material waste. Every failed print or dimensionally inaccurate part consumes costly raw materials unnecessarily, directly impacting your bottom line. By ensuring your printer operates optimally, you minimize these instances, leading to substantial cost savings on filament or resin. This reduction in print failures also drastically cuts down on frustrating rework time, freeing up valuable resources and boosting overall operational efficiency.
Beyond avoiding waste, precision calibration guarantees the dimensional accuracy crucial for functional prototypes and production-grade components. This consistency across batches is vital for quality control and reliability, ensuring every part meets specifications without costly post-processing adjustments. Furthermore, properly calibrated movements reduce stress on your printer’s mechanical components, extending their lifespan and delaying expensive maintenance or replacements. Ultimately, superior print quality translates to higher customer satisfaction and better end-product outcomes, reinforcing your reputation and fostering repeat business. If you’re looking for a deeper dive into the technical aspects of achieving pristine prints, this guide on advanced print quality offers excellent insights.
Clearly, the strategic pursuit of precision isn’t just about crafting perfect objects; it’s a robust strategy for enhancing operational efficiency, driving down costs, and maximizing your 3D printing return on investment. Now that we’ve established the compelling financial case for precision, let’s turn our attention to the practical steps required, starting with the essential tools and preparations for embarking on your calibration journey.
Getting Started: Essential Tools and Preparations for Calibration
Now that the financial impetus for meticulous 3D printer calibration is clear, let’s roll up our sleeves and prepare for the practical work ahead. Your journey to peak efficiency begins with gathering the right 3D printer tools and setting a meticulous stage.
First, assemble your essential toolkit. A precise feeler gauge is indispensable for accurate bed leveling, though a standard sheet of paper can suffice in a pinch. A reliable caliper is crucial for verifying dimensional accuracy, ensuring your prints match their digital blueprints. Beyond hardware, have a calibration cube and other specific test prints ready; these are your diagnostic prints, designed to highlight specific areas needing adjustment.
Next, focus on fundamental calibration preparations. Always begin with a pristine work area: ensure a perfectly clean print surface, free of dust, debris, or old filament remnants. A clear, obstruction-free nozzle is equally vital – even a partial clog can throw off your measurements. Concurrently, familiarize yourself with your printer’s firmware (Marlin, Klipper, or proprietary systems) to understand how to access and adjust critical settings. Prepare your preferred slicer software with a dedicated calibration profile, ready for granular parameter adjustments. Lastly, select a standard, high-quality PLA filament for your initial tests. Consistency in material removes variables, allowing you to isolate and address mechanical and software discrepancies effectively.
With your workspace and software primed, you’re now ready to tackle the absolute cornerstone of reliable 3D printing: the foundational steps of bed leveling and Z-offset calibration.
The Foundational Step: Bed Leveling and Z-Offset Calibration
As you embark on your journey of precise 3D printer calibration for beginners, the very first hurdle is mastering bed leveling and Z-offset calibration. These two parameters are the bedrock of successful prints, directly dictating your first layer adhesion – the make-or-break moment for any project. Without a perfectly level bed and an accurately set Z-offset, your prints are doomed to warp, detach, or turn into spaghetti.
Manual bed leveling typically involves moving the print head to various points across the build plate and adjusting the bed height until a piece of paper or a feeler gauge can just slide between the nozzle and the bed with slight resistance. For printers equipped with automatic bed leveling (ABL) systems, the process involves probing the bed’s surface to create a mesh map. However, even with ABL, fine-tuning is often required. The next critical step is Z-offset calibration, which determines the exact distance between your nozzle and the build surface after leveling. A correct Z-offset ensures that satisfying “squish,” where the first layer adheres firmly without being too thin (leading to “elephant’s foot”) or too thick (resulting in poor adhesion). This intricate dance between nozzle and bed is fundamental. For a visual guide on these crucial steps, check out this excellent bed leveling and Z-offset tutorial. Failing to properly calibrate here is a primary cause of wasted filament and failed prints, significantly impacting your ROI.
Once you’ve conquered the bed, ensuring a flawless foundation, your attention shifts to the very heart of material delivery: ensuring your extruder is pushing out the exact amount of filament required.
Extruder Calibration (E-Steps): Ensuring Accurate Material Flow
With a perfectly leveled bed beneath you, your focus now shifts to the very source of your material: the extruder. For truly consistent prints and efficient filament usage, you need to ensure your extruder pushes precisely the right amount of material. This is where extruder calibration, specifically E-steps calibration, becomes indispensable.
E-steps, or Extruder Steps Per Millimeter, defines how many motor steps your extruder motor needs to take to push exactly one millimeter of filament. If this value is off, your printer will either push too much filament (leading to over-extrusion) or too little (under-extrusion), directly impacting part dimensions and material consumption. To calibrate, you’ll heat your hotend to a typical printing temperature, mark a precise length (e.g., 120mm) on your filament just before it enters the extruder, and then command your printer to extrude a known amount, typically 100mm. Measure the actual length extruded (or remaining filament) and use a simple formula (Current E-steps * (Desired Length / Actual Length)) to calculate your new, accurate E-step value. You’ll then update this setting in your printer’s firmware. For a clear walkthrough of this vital process, check out this E-steps calibration tutorial.
Incorrect E-steps are a silent killer of print quality and ROI. Over-extrusion wastes filament, creates stringing and blobs, while under-extrusion results in weak, brittle parts with visible gaps, hindering filament accuracy and print strength. Achieving accurate material flow through precise E-steps ensures that your printer consumes material exactly as intended and that your parts are dimensionally accurate. This is a fundamental step in any comprehensive 3D printer calibration guide.
Once your E-steps are perfectly tuned for accurate material delivery, the next variable to master for optimal print quality and efficiency is ensuring your hotend and bed temperatures are spot on for your chosen filament.
Temperature Tuning: Optimizing Hotend and Bed Temperatures
With E-steps dialed in, the next crucial step in your 3D printer calibration guide for maximizing ROI lies in precise temperature tuning. Both hotend temperature and bed temperature are paramount for successful prints, directly impacting filament adhesion, robust layer bonding, and ultimately, the mechanical strength of your parts. Too low, and you risk poor layer adhesion and brittle prints; too high, and you invite oozing, stringing, and reduced part integrity.
To find the ideal hotend temperature for specific filaments, conducting a temperature tower test is indispensable. This simple print changes temperature at different heights, allowing you to visually identify the best setting for optimal surface finish, strength, and bridging for your particular material. For a great resource, check out this temperature tower guide. Simultaneously, an accurately calibrated bed temperature is vital to prevent warping, especially with materials like ABS or PETG, and ensures impeccable first-layer filament adhesion, preventing frustrating print failures and wasted filament accuracy. Different filament types (PLA, PETG, ABS, Nylon) each demand distinct hotend and bed temperatures, making this calibration a recurring necessity. Getting these temperatures wrong invariably leads to failed prints, poor quality, and unnecessary material waste, directly eating into your ROI.
Once you’ve mastered the thermal sweet spot, the final frontier in achieving truly dimensionally accurate prints lies in fine-tuning your material output—your flow rate.
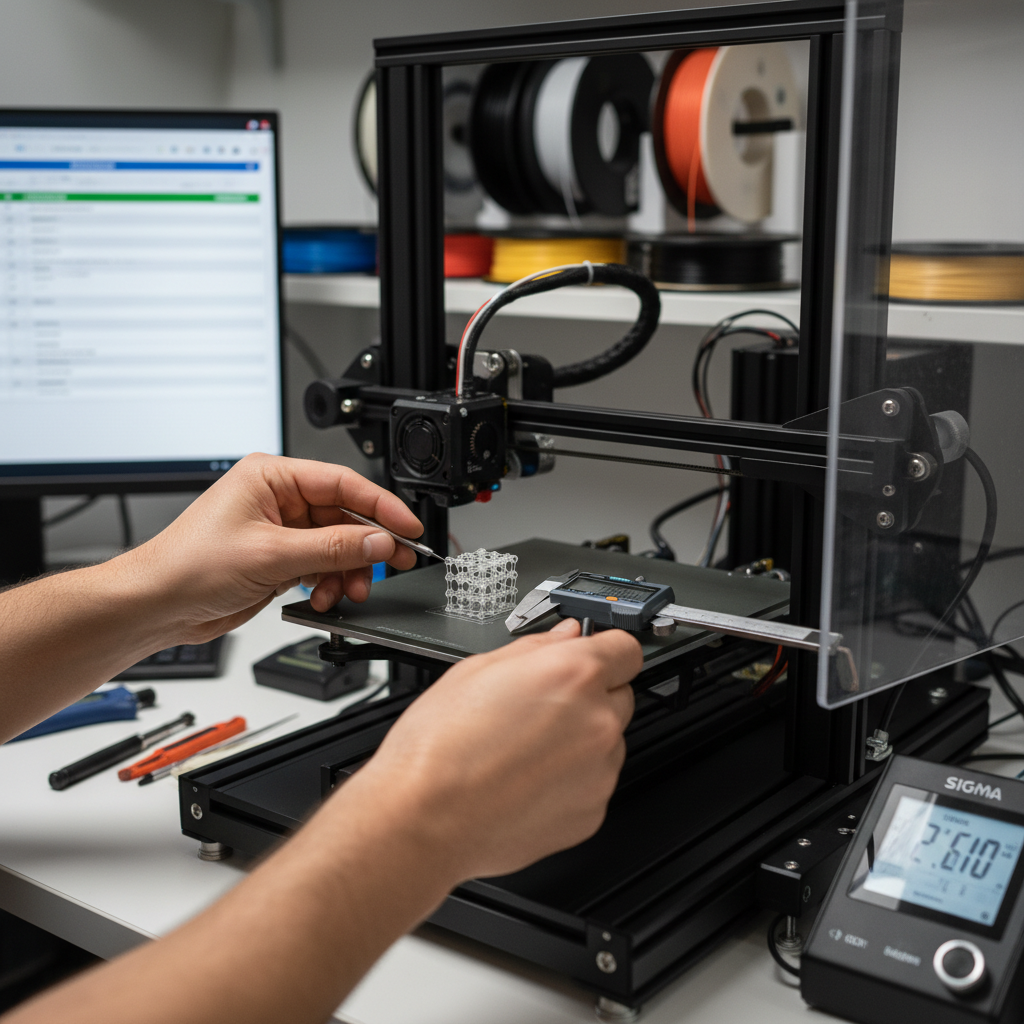
Flow Rate Calibration: Fine-Tuning Material Output for Dimensional Accuracy
Once you’ve mastered the thermal sweet spot, the final frontier in achieving truly dimensionally accurate prints lies in fine-tuning your material output—your flow rate. It’s crucial to distinguish flow rate calibration from E-steps: E-steps calibrate the hardware, ensuring your extruder motor pushes the correct length of filament. Flow rate, however, is a slicer setting that adjusts the volume of plastic extruded, compensating for filament diameter variances and ensuring precise material output for perfect part dimensions.
To calibrate, print a single-wall cube (or similar thin-walled test print) with no infill or top layers. After printing, accurately measure the thickness of the printed wall with calipers. Compare this measurement to your slicer’s expected wall thickness (typically your nozzle diameter). If your measured wall is thicker, you’re over-extruding; if it’s thinner, you’re under-extruding. Adjust your flow rate percentage in your slicer settings accordingly.
Proper flow rate is paramount for dimensional accuracy, ensuring components fit together perfectly and designs translate precisely from screen to print. It dramatically impacts surface finish, preventing issues like over-extrusion artifacts or gaps between layers. Correcting flow rate not only reduces internal voids for stronger parts but also leads to significant over-extrusion prevention, saving valuable material and post-processing time. With optimal material output, your prints will be cleaner and more true to design.
Even with ideal flow rate, unwanted wisps and blobs can still appear on your prints. To truly combat these artifacts and achieve pristine part quality, our next step is to delve into the nuances of retraction settings.
Retraction Settings: Combating Stringing and Blobs for Cleaner Prints
Even with ideal flow rates, those frustrating wisps and blobs can still mar an otherwise perfect print. This is where retraction settings become your best ally. Retraction is the crucial process where your 3D printer briefly pulls the filament back into the nozzle when the print head moves between separate parts of a model, preventing molten plastic from oozing out unintentionally. Mastering this mechanism is key to eliminating unsightly stringing – those fine threads connecting different sections – and annoying blobs that speckle your surfaces.
The two critical parameters for retraction are retraction distance and retraction speed. Distance determines how far the filament is pulled back; too little leads to stringing, while too much can cause clogs or even filament grinding. Speed dictates how quickly this action occurs; an optimal speed ensures a clean break. You’ll want to run dedicated retraction test prints to fine-tune these values, as incorrect settings directly translate to increased post-processing time and wasted material. Moreover, consider your extruder type: Bowden setups generally require longer retraction distance compared to direct drive systems due to the greater distance the filament travels. Achieving ideal retraction settings yields dramatically cleaner prints, significantly boosting your ROI.
With these fundamental mechanical calibrations optimized, we’re now ready to explore deeper technical aspects and software efficiencies, beginning with advanced calibration techniques like PID tuning.
Advanced Calibration: PID Tuning and Slicer Optimization
Moving beyond mechanical refinements, true peak efficiency demands a deep dive into your printer’s control systems and software. A crucial step here is PID tuning, which optimizes your hotend and heated bed for unwavering temperature stability. By calibrating these proportional, integral, and derivative values, you dramatically reduce temperature fluctuations that can lead to inconsistent extrusion and layer adhesion issues, directly impacting print quality and part strength.
Further enhancing your advanced 3D printer calibration strategy involves meticulous slicer optimization. Beyond basic settings, understanding how layer height impacts detail versus print time, or how infill settings balance strength against material consumption, is vital for maximizing ROI. The interplay of these settings with print speed is especially critical; pushing speed too high without proper compensation will degrade quality, while finding the sweet spot can shave hours off production time. For unparalleled precision, calibrating linear advance (or pressure advance on Klipper systems) is paramount. This feature proactively adjusts extrusion to prevent material buildup at corners and ensure consistent line width, resulting in sharper features and smoother walls. For a deeper dive into this often-overlooked calibration, check out this guide on pressure advance. Experimenting with advanced features like vase mode or adaptive layers can also unlock efficiencies for specific print challenges.
Mastering these software-driven calibrations can transform your printer from a capable machine into a high-performance asset. However, this level of precision isn’t a “set it and forget it” affair; ongoing attention is key to sustaining these benefits.
Maintaining Calibration: A Proactive Approach to Efficiency
To truly unlock and sustain peak performance, maintaining calibration requires a disciplined, ongoing approach – it’s far from a “set it and forget it” endeavor. Establishing a consistent calibration schedule – perhaps monthly, or whenever you switch to a new filament type – is paramount. Learning to spot subtle signs of miscalibration early, such as inconsistent layer lines or poor adhesion, can prevent minor hiccups from escalating into major print failures. Always keep a log of your optimal settings and test results; this simple documentation becomes an invaluable reference for quickly restoring performance or diagnosing future issues.
Beyond software tweaks, don’t overlook the physical health of your machine. Proactive maintenance, like regularly cleaning the build plate, tightening loose belts, and lubricating moving parts, is just as crucial. This kind of attention isn’t merely about prolonging lifespan; it directly prevents costly printer downtime and reduces the need for expensive repairs, significantly boosting your ROI and ensuring truly cost-effective 3D printing for long-term efficiency. For a deeper dive into general printer upkeep, consider this comprehensive guide on preventative maintenance. Even with the most diligent maintenance routine, occasional issues are inevitable. Understanding how to diagnose and address them quickly is the next step to keeping your printer running smoothly.
Troubleshooting Common Calibration Issues
When prints go awry despite your best maintenance efforts, mastering the art of troubleshooting becomes your next profit protector. A systematic approach to troubleshooting 3D prints can quickly pinpoint the culprit behind common calibration issues. Experiencing a poor first layer? That often signals bed leveling or Z-offset problems. Persistent stringing usually points to retraction settings or temperature, while seeking warping solutions might mean adjusting bed temperature, adhesion, or environmental controls. Inconsistent extrusion, on the other hand, frequently suggests nozzle clogs or incorrect flow rates.
Approach these problems with a diagnostic mindset, almost like following a mental flowchart: pinpoint the symptom, then methodically test the most probable causes. Always factor in filament quality and storage; moisture absorption is a surprisingly common, overlooked contributor to print failures. For stubborn calibration issues, don’t hesitate to reset your printer to its factory defaults and meticulously re-calibrate step-by-step. And when truly stumped, leverage the collective wisdom of online communities; they’re an incredible resource for specific troubleshooting 3D prints. For an extensive resource on diagnosing various printer woes, check out All3DP’s comprehensive troubleshooting guide.
Senior technology analyst covering enterprise software, AI, and digital transformation. James has spent over a decade helping business leaders understand how emerging tech reshapes competitive strategy.